
Back in business, I am alive and well, and working in an embedded software company.
For Christmas we play “secret Santa” with my family, and this year I was going to take the crown home with me. We only have one rule, and this is: “you have to do it yourself”.
I had some spare parts from past projects (or tinkering) and a rough idea of what to do: a calendar clock. And here we have the first post describing how I created the clock.
This post is just the overall design. Kind of an overview of what the clock will do, for more “meaty” content stay tuned, I plan on writing posts about each aspect:
- Wiring the DIY clock.
- A 3×3 font for LED matrix displays.
- Programming the DIY clock.
- Arduino and tinyRTC
- Arduino and 4 led matrices
- Arduino clock software
- Casing the DIY clock.
As you can see, I am mostly software oriented (as usual :-D)
Design
The clock is mainly formed by a display, the control electronics, three buttons,
and a methacrylate case.

The display
The display is built using four 8×8 led matrices that I have lying around, creating a 32×8 display. Nothing extremely fancy, but enough for the purpose of the project. I toyed with the idea of buying other pieces (like a TFT screen) but since cost was a key factor and the led matrices were already in my possession I just scraped the idea.
It has two modes of operation:
- Show the hour.
- Show the name of the date alongside the hour.
On the basic operation mode, the clock simply presents the current time:

Displaying 10:46
The second operation mode splits the screen in two halves of 32×4. The top half shows the current time, the bottom half has the title of the day, with a maximum of 8 letters, mostly because I dislike scrolling screens. The following example is new year’s day. As you can easily see, the font is quite constrained and it may need some eye training to get used too. As a matter of fact, it looks better on the led display when looking from a distance.
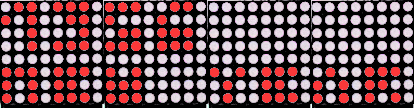
new year’s day
This two modes of operation are the main modes. There are some submodes mainly to set up the time and date, there is no option to create a new special event from the clock itself.
Generic Electronics
Electronically you’d better check its own blog post, but as an overview:
- Arduino nano.
- RTC module.
- MAX7219 Red Dot Matrix Module.
- Three pushbuttons.
The Arduino is directly connected to the first led matrix module, to the RTC module and to the three pushbuttons.
Powering
This is powered up directly via Arduino nano using a mini USB connector.
Setting up
The set up mode is driven with the three buttons. One is the Set Up button, the other two are the up and down buttons.
The idea to set the clock is:
USER: Keep the SETUP button pressed around three seconds
SYS: Present the set hour mode
USER: Press UP/DOWN buttons to set the hour
USER: Press SETUP when it is done
SYS: Present the set minute mode
USER: Press UP/DOWN buttons to set the minute
USER: Press SETUP when it is done
Rinse and repeat with: month, day, year
After setting up all the screen, the time and date are saved in the RTC module.

Example day set up
The whole state diagram
I think of the clock as a set of states (as described in earlier sections). This graph represents all the states and transitions of the clock:

DIY clock state diagram
- UP Up button is pressed
- DOWN Down button is pressed
- SETUP Set Up button is pressed
It will mostly switch between BIG HOUR mode and EVENT HOUR mode. EVENT HOUR mode is only activated when the day is special (maybe, 40 special days a year?).
Casing
The casing theme was: “let’s see what’s inside”
For this reason the case is fully transparent, made with methacrylate. I am no DIY master, nor I have a lot of knowledge building cases, so for this step an architect (friend of mine) prepared the drawings and told me where to go for the laser cutting.
Wishlist
This is the design I came up to according to my resources and time. But there
are some things that were left in the ideas cabinet:
- Icons for dates maybe?. I can already draw icons, but I only use them on boot and setup.
- Set up new event days from the same clock. Probably very clunky, imagine the SNES video games text selection and make it worse.
- Read event days from an SD card. This would be awesome since the user could add its own events. And I would not bother with µC available memory.
- Basic alarm mode, mainly to wake up. Implies a buzzer and more configuration screens.
- Temperature? this was something easy to add, but I don’t know how to fit it with the hour mode.
- TFT screen. (Changes a lot the project)
- All inside a wood case with a thin front wood panel. The idea is that the brightness of the leds can be seen through it.
Closing
As I said, I plan a set of posts for this clock DIY. But the clock is already finished, so, here comes a picture of it to get a better idea of what are we talking about.

The Clock Finished (Almost)

Pingback: The dropped posts, and 2017 closing | Castells