

You are in for a treat, static websites are back from the dead (they never left, but were not prominent nor sexy). Combine this with the cheapness of file hostings like S3 and you have a winner here.
There’s a much better documentation on how to do so in the same Amazon website, but I figured I could write a small post anyway. I’ve been toying in the past to move the wordpress.com website to a static website, but this is a story for another day (or for never!).
Entering Hugo
There are many static website generators (or, frameworks) to choose from. I centred in Hugo, which is kind enough to the user and has a very good documentation.
You first install it
sudo apt install Hugo
Then create a website
hugo new site whatever
Make some basic changes to the config.toml file (like theme, base domain etc)
vim config.toml
Add some content to the website:
hugo new posts/hello.md
And finally, start a local Hugo server
hugo server -D
Well, that’s it, now you are serving a base, classic, static HTML+CSS webpage.
Serving that website
Now you have the website locally and ready to run. That is actually a draft web, so before serving it online, you first have to run a build step. What that means is that hugo will parse all the files (static pictures, markdown to HTML etc.) and store them in a tidily packed directory, ready to be served from any basic web server.
To do that simply call hugo
hugo
And it will build everything, although I prefer to call it with an extra flag:
hugo --cleanDestinationDir
It’s clear enough that this flag will first remove everything on the destination directory and then build :-).
Serving that website from amazon
You can rig those HTML files to any available web server.
What I didn’t expect is that Amazon S3 file storage has an option to serve a bucket as a web server. So, let’s say there’s have a bucket called mywebsite, and the Amazon command line client is installed. To update your site you only have to run:
aws s3 sync public/ s3://mywebsite
public being the default folder where Hugo stores your built files. But just in case let’s go step by step.
ONE: Login to Amazon web services (or create an account)
TWO: Create a bucket.
This is actually as easy as going to Services->S3 and pressing create-bucket.
The only thing to note if you never worked with S3 buckets is that the names are global and to deploy a website the bucket has to be public (so be careful what you add there).


THREE: Set up that bucket as a web server
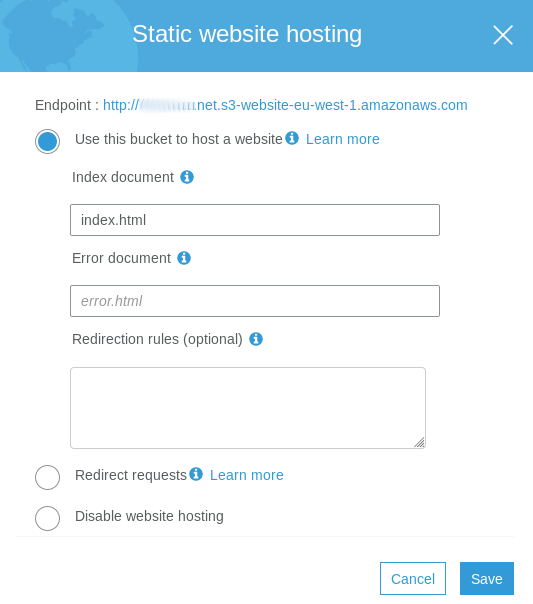
This is actually stupidly easy. Go to the bucket properties and click the big static web hosting icon.
Once opened, simply enable the static web hosting and make it point to the classic index.html file, and it’s done, copy the provided URL, and the website should be already up after clicking save.
CARAMBA: It is done
Serving from an actually nice url
From now on, your website lives on a link similar to http://whatever.s3-website-eu-west-1.amazonaws.com/. As you can see, it just rolls off the tongue 🙂
What if you want to host it somewhere else? Maybe, http://www.rollsoffthetongue.nl?. Well, first you need to own that domain and transfer it to Amazon if it’s not already there. How to do this could depend on the given provider and you probably need to follow amazon’s documentation on how to do it. Also, note that this will cost some real life money :-O.
But at the end, you should be the proud owner of http://www.rollsoffthetongue.nl and be able to manage it from amazon route 53 (who comes up with those names?).
Amazon has a lot of options to handle, so it’s easy to get lost, here I’ll explain (not in detail) how everything should be set up.
1. Go to route53->hosted zones
2. Create a hosted zone named rollsoffthetongue.nl if it’s not already there.
3. Go to route53->registered domains
4. Ensure rollsoffthetongue.nl is there. And more importantly, it shares the same nameservers as the hosted zone.
5. Now, find the button called Go to record sets
6. Once in record sets, you’ll have to create a new record set with the following setup:
name: rollsofthetongue.nl
type: A – IPv4 address
Alias: True -> s3-website.us-east-2.amazonaws.com
Note that the alias should point to the specific s3 region, so be aware of that. And also, for that to work, the S3 bucket should be called exactly rollsofthetongue.nl
Save, leave it some time to propagate the changes and DONE! You have a static website in S3 using a DNS. The idea is that this should be quite cheaper compared to running a site on an EC2 server and for a simple one should suffice. I don’t have to tell you to keep an eye on your bills, right?
Tight now, only rollofthetongue.nl is serving the website. If you want that the www prefix results also presents the website, you’ll have to create another bucket called www.rollsofthetongue.nl that redirects to the original bucket, and repeat the DNS process from point 3 but changing everything I said to www.rollsofthetongue.nl
Future and scheduled posts
hugo by default will only build posts that are not marked as draft and not in the future. You can easily use that to your advantage to schedule posts.
Imagine the following hugo post:
+++
publishdate = "2090-11-06"
date = "2090-11-06"
draft = false
title = "THIS IS THE FUTURE"

+++

The future may be excellent or may be horrible. Who knows.
By default, it won’t be built into your website because the publishdate is too far away. But when that date comes, hugo will simply add it to the build.
What I’ve done so far to handle scheduled posts is simply have a script that runs daily, builds and syncs to S3. Yes yes, this is totally dependant on my laptop running, but you can see that this can be set-up also on another machine (like a tiny EC2 instance) alongside a git repo with the latest version of your website.
The script goes like this:
#!/bin/bash

cd /wherever/the/hugo/project/is
hugo --cleanDestinationDir
aws s3 sync public/ s3://rollsofthetongue.nl
And I don’t think it needs any kind of explanation.
References
As commented, everything is explained in more detail by Amazon themselves.
