

I discovered XCircuit when looking for an easy and quick way to generate a schematic.
Since I am not going to simulate it, it would be enough to have a vector design program like Inkscape, but it’s never too late to learn a tool that may prove useful in the future.
There are other bigger, better, stronger EDA tools: Geda, KiCAD, EagleCAD… but I settled for something designed for publications.
(…)program for drawing publishable-quality electrical circuit schematic diagrams and related figures(…)
— XCircuit website
In this post you’ll find a quick overview of XCircuit, and how to create a module with it.
XCircuit
XCircuit is what it is, an ugly tcl/tk interfaced program that generates viewtiful schematics in PostScript. It is perfect for what I need.
Interface Overview
This is not something you are used to.

X circuit main window
The interface is not bad, it is actually quite simple, with a big BUT. It looks like something familiar, but behaves in unexpected ways. My mind is hard-wired to programs like Inkscape, GIMP, or even LogicWorks (used looong time ago).
It has the usual items:
- Menu bar (File, Edit, etc…)
- Icon bar (Mouse access to functions)
- Button Toolbar (Information on the current tool, page, etc…)
All of this paired with a mouse interface that uses the three buttons, it is a must. Luckily, the toolbar will tell us which button does what.
XCircuit bottom toolbar
The Icon bar provides quick access to all the editing options, I miss a tooltip on top of each one to know what it actually is. Even better, a tooltip with the key binding. XCircuit works best when you know the key bindings: w = wire, c = copy etc. I don’t really know what the red P icon is until I press it.
Once you get the hang of it, it’s quite fast to generate a schematic.
I would not use it to generate the full schematic directly, as usual it works best if you first draw something on a paper and then go ahead in the computer.
Drawing the module
Let’s imagine the following situation. We have this small switch, ready to be connected somewhere.

Switch schematic
At the same time, I have around an Arduino UNO or Arduino NG with an ATMega8, I want to add this atmega to my schematic. Here’s the pin out from the data sheet:

Atmega8 pin out
For starters, let’s go to a new page. Either Page Down until we stumble upon an empty page, or via menus:

Go to page
Once in the new page, we start drawing the new part.
First I’ll draw a rectangle with the rectangle tool ![]() .
.
The top of a rectangle needs a half arc. This is achieved with the arc tool ![]() . First click and drag to create a circle, second click to cut the circle to a certain arc, when you finish, just click the middle button.
. First click and drag to create a circle, second click to cut the circle to a certain arc, when you finish, just click the middle button.
For each pin, we’ll use the text tool to write the name. ![]() , after writing it we can bring it to the expected position using the move tool
, after writing it we can bring it to the expected position using the move tool  .
.
This is mostly it. I’ll just use the wire command ![]() to create the out pins and add another text with the title “ATmega8”.
to create the out pins and add another text with the title “ATmega8”.
The title can be rotated using ![]() the rotate tool, and again, moved to wherever you want it. Additionally, you can select the text (middle click) and change the properties of it via the “text” menu.
the rotate tool, and again, moved to wherever you want it. Additionally, you can select the text (middle click) and change the properties of it via the “text” menu.
And, well, nothing else to do here.
Adding the module as a library object
Now, we want to add this module as an object that we can use in the future.
Luckily, this is quite simple. Select the full object with a square selection (middle-click with drag), and then press m. This will bring up the “Save Object” dialog. Where you’ll have to fill mainly the object name
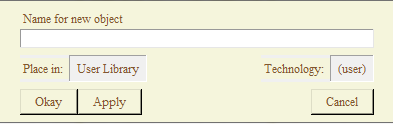
Save new object
.
Note that you can save your object name related to a technology prefixing it with the technology name: technology_name::object_name.
Once the object is saved, it will appear in your libraries pages (press l or L), and you will be able to drag and place it as you please.
Bigger Libraries
When you created a bunch of modules it may be a good idea to save them to a lps file, so you can reload everything later on.
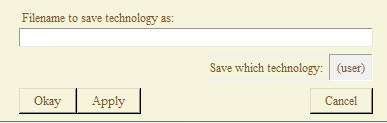
XCircuit Save technology dialog
Browse to File->Save Technology, input a filename (full path) and voilà, everything stored, you can import it again in the future.
The module
Once finished, the module appears on the user library, and can be dragged and dropped as any other item:

xcircuit ATmega8 connected to a switch
Closing Comments
XCircuit is quite useful and works most of the time. I can’t say that is easy to use or friendly in general. Re-reading my post, everything seems very straightforward but that’s far from true. Nevertheless I’m glad that the project exists and that it keeps improving
(last release at the time of this post: Nov 30 2015)
Things I would like to see:
- I have to create a template for DinA4. I know that the .ps result can be scaled accordingly, but it would be nice if you could directly load a rectangle representing a dinA4.
- The save file dialog could improve a lot. I would not mind a standard path search dialog, instead of having to write the full path every time.
- everything is so…. coffee colour?
- More often than not, things just don’t work. You save a .lps file expecting to store your modules, and nothing gets stored, but it creates the empty file. To be fair, I did not investigate it at all, it simply happened
- The file manager is horrendous, I assume is the default tcl/tk file manager.
- Some things just work in a certain way that is confusing… to say the least.
References
XCircuit website ⇒GO
